Dear Em,
I love favor bags that include something that is usable over time. Our favorites are favor bags that include crafts. A few months ago, you went to a birthday party & received a favor bag that included a wooden lizard with paints. You named your lizard Lizzie & loved it. It was a wonderful rainy day activity.
I wanted to do something like that for your Butterfly Birthday Party favor bags. Unfortunately, I couldn't find any wooden butterfly painting activities that weren't crazy expensive (it turns out, I wasn't looking in the right section of the craft store). In fact, even after searching the internet & craft stores, I had a hard time finding anything that wasn't total junk or super expensive. So, I turned to Pinterest.
I made a Butterfly Birthday Board & pinned a bunch of DIYs that looked easy & fun. The first was this Butterfly Sun Catcher Craft I thought the kids would love.I had plans to include all of the paper materials in your favor bags so the kids could make their sun catchers at home. Unfortunately, this was one of those instances where the "easy" Pinterest project ended up being a total pain. Our printer wasn't cooperating, & I couldn't print out the free template from home. I went to Staples to print the butterfly templates, but they wouldn't print them because the image is copyrighted. Whomp Whomp.
That's when Nonnie came & saved the day. She traced & cut out each butterfly template by hand. It was extremely tedious & didn't come out looking exactly the way it did in the website picture. In the end, I think Nonnie was ready to kill me & the butterfly templates. I hope your little friends enjoyed making butterfly suncatchers. We haven't even attempted making ours. I think I'm sick of looking at them, frankly. But I'm still holding out that it will be a fun rainy day activity for you later this year.
Our next craft for the favor bag were these Butterfly Clothespin Magnets. I had plans to make them with you & Nonnie, but Nonnie quickly decided I had too much on my plate. You & Nonnie took over the project, & your butterfly magnets came out super cute.
The last thing to DIY was the favor bags themselves. I had purchased plain, brown bags, & I wanted to glam them up a little bit. We used the same butterfly punch from the craft store that we had decorated the party hats with. Nonnie glued the colorful butterflies onto the bags. It was one of the most simple DIYs we did (& I'm saying this knowing that it was ALL Nonnie).
We cut out circles & glued more punched butterflies to the middle. I wrote "Thank You!," punched a star hole through the circle, & used some pink twine to fasten the circles to each bag (Nonnie actually let me do that part). We filled up the favor bags with the Butterfly sun catchers, a butterfly airplane, a butterfly straw, & butterfly bubbles. Then we clipped the butterfly clothespin magnets to the tops of the bags. Viola, we had favor bags.
Not everything turned out exactly the way I had envisioned, & it al took a lot more time & energy than I would have hoped (so thankful that Nonnie was there to help/take over). Still, I think our favor bags were really stinkin' cute. They were a cute way to send off your little friends & let them know we were glad they were able to come to your party. And hopefully, some of the contents were usable over time (I know we've been using the clothespin butterflies as chip clips).
I love you so,
Mommy
Showing posts with label DIY gifts with kids. Show all posts
Thursday, September 3, 2015
Thursday, February 12, 2015
Throwback Thursday: A Walk Through Valentine Making Memory Lane
Dear Em,
We had so much fun making your Valentine's this year. As we worked together, I smiled thinking about all of your past Valentines. Most of them turned out pretty cute, but some were pretty miserable to make.
We started out fairly easy. Your first Valentine's Day, you were not even two months old. We had a little Valentine themed photo shoot, & I used the pictures to make photo cards for Daddy & our parents. At a month & a half old, it was tough to get photos of you where you were looking at the camera & not moving or crying.
But just look at that cute, teeny, little bum.
The next year we did the same thing, a photo shoot & photo cards. This photo shoot proved to be even tougher. You moved around a lot & ate most of the props.
2012 was the first year you had classmates to give Valentines to, & we got a little more creative. Our Valentines still involved a photo shoot. I asked you to hold your hand out in a fist. We printed your photos with a message & slid lollipops into a slit in the photo. Your Valentines became 3D & looked like you were holding out a lollipop to your friends. These Valentine's were cute & fairly easy. At the age of two, you couldn't understand why I wanted you to hold your hand out in a fist...I don't think you even understood what a fist really was. I finally gave you a clip to hold in your hand & asked you to hold it out to me. We ended up with an OK shot. We should have called it a day at that point, but I decided to get fancy & make hand print Valentines for our friends & family members as well. They came out cute, but my little Valentine was pretty Valentined out by then. You were a cranky mess, & I realized maybe I had overdone things a little.
Of course after overdoing things the previous year, in 2013 I decided to take overdoing it to a whole new level. You had studied owls in school that year, & I found adorable Valentine owl bags that we could put together. You were really into it...for the first two bags. Unfortunately, I think we made 40 of them. Of course I had to add another owl making Valentine project, which involved a lot of cutting & using the hot glue gun...which pretty much meant you couldn't even participate in that portion of your Valentines. Then we made cookies (because I felt guilty your Valentines didn't have a candy/treat component)...which may have happened after you were already asleep, because, lets face it, we were both exhausted from making your Valentines that year.
The next year, I was still burnt out from Valentine making & we decided to go back to the 3D lollipop Valentines. We did another photo shoot, & I realized we should never have a photo shoot before you've eaten breakfast. In the end, we got a cute photo, & you helped create your Valentines by writing your classmate's names by tracing over what I had written in yellow marker. There were only a few tears involved in the creation of those Valentines, & I called it a success.
This year, I decided to take a new approach. I looked up handmade Valentines on Pinterest, & asked you to look through them with me. As we scrolled through, I let you pick out your favorite. You chose a cute, little Olaf Valentine. I shouldn't have been surprised that the Valentine you chose was Frozen themed.
Here's what we needed.
It looked fairly easy to make, & I was confident this was a Valentine we could work on together. We downloaded & printed the free file (we printed extras to allow for mistakes). I cut them out into rectangles. Armed with a list of your Valentines, you addressed each one all by yourself. You read off each name on your list, tried to use what you thought was that person's favorite color, & carefully wrote out each name. It took you quite a while (you have over 30 Valentines this year). You worked so hard, & I watched from a distance, beaming with pride. I couldn't believe that you were working on your Valentines ALL BY YOURSELF. You made a few mistakes, but you remained very patient.
After you were done addressing your Valentines, you had fun adding some extra decorations. You added Frozen, heart, & winter themed sticks to the backs of each page. You were very careful to try to use each person's favorite colors & Frozen characters. It was really stinkin' cute.
Once we were done, we filled the bags together with the melted Olaf goodies. Each bag had 3 large marshmallows (the body), two mini marshmallows (the feet), a candy corn nose, two pretzel sticks for arms, two mini chocolate kisses for eyes, & two M&Ms for buttons (we tried to use brown, but once we ran out we used other colors). It truly looked like bags of little, melted Olafs. You passed me each addressed Valentine, & I stapled them to the bags.
They came out really stinkin' cute, & you loved every moment of making these Valentines. There were no Valentine tears this year!!! Perhaps the secret is in letting you pick out an age appropriate Valentine project. Please remind me of this next year!
I love you so,
Mommy
To see some of our past Valentines, click on the following links...
2012: Hand print Valentines & 3D Lollipop Valentines
2013: Owl Valentines
2014: 3D Flower Lollipop Valentines
We had so much fun making your Valentine's this year. As we worked together, I smiled thinking about all of your past Valentines. Most of them turned out pretty cute, but some were pretty miserable to make.
We started out fairly easy. Your first Valentine's Day, you were not even two months old. We had a little Valentine themed photo shoot, & I used the pictures to make photo cards for Daddy & our parents. At a month & a half old, it was tough to get photos of you where you were looking at the camera & not moving or crying.
But just look at that cute, teeny, little bum.
The next year we did the same thing, a photo shoot & photo cards. This photo shoot proved to be even tougher. You moved around a lot & ate most of the props.
2012 was the first year you had classmates to give Valentines to, & we got a little more creative. Our Valentines still involved a photo shoot. I asked you to hold your hand out in a fist. We printed your photos with a message & slid lollipops into a slit in the photo. Your Valentines became 3D & looked like you were holding out a lollipop to your friends. These Valentine's were cute & fairly easy. At the age of two, you couldn't understand why I wanted you to hold your hand out in a fist...I don't think you even understood what a fist really was. I finally gave you a clip to hold in your hand & asked you to hold it out to me. We ended up with an OK shot. We should have called it a day at that point, but I decided to get fancy & make hand print Valentines for our friends & family members as well. They came out cute, but my little Valentine was pretty Valentined out by then. You were a cranky mess, & I realized maybe I had overdone things a little.
Of course after overdoing things the previous year, in 2013 I decided to take overdoing it to a whole new level. You had studied owls in school that year, & I found adorable Valentine owl bags that we could put together. You were really into it...for the first two bags. Unfortunately, I think we made 40 of them. Of course I had to add another owl making Valentine project, which involved a lot of cutting & using the hot glue gun...which pretty much meant you couldn't even participate in that portion of your Valentines. Then we made cookies (because I felt guilty your Valentines didn't have a candy/treat component)...which may have happened after you were already asleep, because, lets face it, we were both exhausted from making your Valentines that year.
The next year, I was still burnt out from Valentine making & we decided to go back to the 3D lollipop Valentines. We did another photo shoot, & I realized we should never have a photo shoot before you've eaten breakfast. In the end, we got a cute photo, & you helped create your Valentines by writing your classmate's names by tracing over what I had written in yellow marker. There were only a few tears involved in the creation of those Valentines, & I called it a success.
This year, I decided to take a new approach. I looked up handmade Valentines on Pinterest, & asked you to look through them with me. As we scrolled through, I let you pick out your favorite. You chose a cute, little Olaf Valentine. I shouldn't have been surprised that the Valentine you chose was Frozen themed.
Here's what we needed.
- Printed Cards (free download from One Creative Mommy)
- Markers to address Valentines
- Stickers (optional)
- Pretzel sticks
- Candy Corn (since it's out of season, I ordered it from Amazon)
- mini chocolate kisses
- regular sized marshmallows
- mini marshmallows
- M&Ms (preferably brown)
- plastic bags
- a stapler
It looked fairly easy to make, & I was confident this was a Valentine we could work on together. We downloaded & printed the free file (we printed extras to allow for mistakes). I cut them out into rectangles. Armed with a list of your Valentines, you addressed each one all by yourself. You read off each name on your list, tried to use what you thought was that person's favorite color, & carefully wrote out each name. It took you quite a while (you have over 30 Valentines this year). You worked so hard, & I watched from a distance, beaming with pride. I couldn't believe that you were working on your Valentines ALL BY YOURSELF. You made a few mistakes, but you remained very patient.
After you were done addressing your Valentines, you had fun adding some extra decorations. You added Frozen, heart, & winter themed sticks to the backs of each page. You were very careful to try to use each person's favorite colors & Frozen characters. It was really stinkin' cute.
Once we were done, we filled the bags together with the melted Olaf goodies. Each bag had 3 large marshmallows (the body), two mini marshmallows (the feet), a candy corn nose, two pretzel sticks for arms, two mini chocolate kisses for eyes, & two M&Ms for buttons (we tried to use brown, but once we ran out we used other colors). It truly looked like bags of little, melted Olafs. You passed me each addressed Valentine, & I stapled them to the bags.
They came out really stinkin' cute, & you loved every moment of making these Valentines. There were no Valentine tears this year!!! Perhaps the secret is in letting you pick out an age appropriate Valentine project. Please remind me of this next year!
I love you so,
Mommy
To see some of our past Valentines, click on the following links...
2012: Hand print Valentines & 3D Lollipop Valentines
2013: Owl Valentines
2014: 3D Flower Lollipop Valentines
Monday, December 22, 2014
Our DIY Pinecone Christmas Trees
Dear Em,
You did so much crafting this holiday season. We made six shell heart frames & tons of Christmas tree pinecones. You were so excited to craft together in November, but when I told you we were finally finishing our last crafts in mid December, a look of relief spread over your face. You were ready for some Christmas movie down time.
The idea for the Christmas tree pinecones actually came a year ago. We went for a walk in a park in North Carolina & found giant pinecones littered everywhere across the park grounds. I remarked how much they reminded me of pinecones from the Redwood Forest in California & how they would be great to use in making Christmas crafts (which is probably because we had just made these). Your Nonnie agreed, & so the three of us spent the rest of our walk at the park collecting pinecones. We tried to pick large, straight ones. There were so many to choose from, & we ended up returning home with a big bag full.
That bag sat in our basement until a couple months ago. Not knowing exactly what kind of Christmas craft to make, I turned to Pinterest. If you type in "Christmas pinecone crafts," you will find endless ideas. I pinned a few ideas that would work with the giant pinecones we had & then asked you which idea you liked best. You chose to make glittery Christmas trees with a gold star on top.
We used:
- Large Pinecones
- Small Wood Stars
- Gold Paint
- Mod Podge (spray & regular)
- Gold & Silver Glitter
- Paint Brushes
- A piece of cardboard to catch the paint & glitter
- Wire Cutters (if you want to trim the bottoms of the pinecone)
While you painted the stars gold, we enlisted your uncle Jared's help with the pinecones. Some of them were crooked, & he trimmed the bottoms a little so the pinecones would stand a little straighter. Note to self, teenage boys (& maybe most males) do not enjoy making Christmas crafts like you & I do. Jared pretty much hated me 90% of the time I enlisted him to help out with our craft. Sorry, Jared.
While you painted the stars independently, you & I glittered the trees together. Using paint brushes, we generously covered the pinecones in Mod Podge, trying to get every crevice (we probably could have used spray Mod Podge & it would have been easier but then you wouldn't have been able to help as much). Once our pinecone was covered in sticky Mod Podge, we generously sprinkled a mix of gold & silver glitter (creating a champagne glitter look) all over the pinecone.
Later, I sprayed Mod Podge thoroughly all over the pinecones to seal the glitter onto the pinecones. After they all dried, I used a glue gun to fasten the gold stars to to the top of the pinecones. You & I both loved how they turned out. I mean, when you take an adventure at the park & add Mod Podge & glitter (it's still all over the house, poor Daddy), what's not to love?
I think our "trees" are such fun holiday gifts for some of the special people in our lives. I love them so much, we took a bunch for our home (since we made more than twenty, we were able to keep some for ourselves & still gift them to many of our friends & family & your teachers). I love the natural & festive elements they bring to our holiday decor. Looking at them & knowing that my almost five year old & I (& Uncle Jared, sorry Jared) made them together...I think they are going to make me smile for years to come.
I love you so,
Mommy
Tuesday, September 9, 2014
there's beauty in things that are broken
Dear Em,
We've started working on our Christmas gifts, in a way that I didn't at all plan. You see, every time we went to the beach, you looked for shells & pretty rocks. You will walk for miles on the beach if you have a shell collecting bag in your hand.
I filled a mason jar with some of your shells, & placed it on a shelf in our living room. Tons of shells & rocks remained. Faced with the possibility of finding multiple spots for shell filled mason jars, I wondered what else we could do with all the broken shells. Then I had an idea.
I traced a heart on a piece of paper & asked you to use the small rocks & shells like pieces to a puzzle & fill in the heart. Your face was determined as you set to work. In the end you created something beautiful.
I used a glue gun to glue the shells & rocks permanently into place. The first one we gifted just as a card, but the next one we put into a frame.
I love that we can gift to others a piece of Rhode Island & a piece of our adventures at the ocean. I love that it's your handiwork, from discovering & gathering on the beach, to puzzle piecing your treasures into a heart shape. I love that we've taken things that were broken, things that many people would simply discard, & made something beautiful.
Em, there may be times that you feel broken, & I want you to know that you are still beautiful. There may be times that you have to completely start over or rearrange things in a way you never did before. Know that there's beauty in that. There's beauty in things that are broken.
I love you so,
Mommy
Monday, June 9, 2014
I heart Daddy
Dear Em,
With Father's Day coming up this weekend, I thought I'd share a project we made for your daddy for his birthday this year. I have to admit, I stole the idea from Etsy (I'm actually still crushing on a lot of the items that PitterPatterPrint creates & will probably be placing an order soon). It was so cute, I thought it would be fun for you & I to try it out ourselves.
All we needed was a large piece of cardstock paper (we have tons in our craft closet), a paint brush, & paint. I sat you on a step stool (so your feet could still touch the ground) & used the paint brush to cover your foot in paint. I put the cardstock paper on the floor in front of you, & pressed your foot at a slight angle onto the paper. I carried you into the bathroom, placed your foot in the sink, & washed it off before repeating the process with your other foot.
We didn't love the first footprint heart we made. The angle of your footprints wasn't quite right. I chalked it up to a practice piece, & our second attempt came out much better.
Once the paint on the cardstock dried, I had you use yellow marker to write "I" on top of your footprints & "Daddy" underneath your footprints. I painted over your writing so the words would match your footprints.
It was a fun & easy craft, & I love how it came out.
Daddy loved your original masterpiece too.
I love you so.
Mommy
Monday, May 5, 2014
DIY Gifts for Teachers: Painted Flower Pots & Flowers
Dear Em,
Friday was your last day of school. While many of preschoolers at your school enjoy school year round, you get to enjoy a summer vacation full of family, friends, travel, & adventures. We're starting our summer a little early this year, & took you out of school much earlier this year than years past.
A few weeks ago, I started to feel a little weepy about it. You've had such a terrific school year, & I wasn't quite ready for it to end & for the worries of what we might expect for next year to set in. Sure, this year had its challenges, but we had the support of your teachers through it all. We've seen you truly love to go to school. There may have been a couple Saturdays where you were bummed about having to stay home, & you may have scolded Daddy & I for picking you up from school "too early" on occasion.
Daddy & I have both been so thrilled to see you learning & developing & having fun. I love listening to you talk about your day. We love the stories you tell us about the kids you go to school with, and we're constantly surprised by some of the new things you've learned. We've been able to watch you develop such sweet friendships. Playing with your little friends is always one of your Three Favorite Things of each day.
While there had been quite a bit of transition in your classroom, your teachers have been amazing. They've made such a difference in your life. They've made a difference in all our lives. Daddy & I were able to go to work each day knowing that our little love was getting the best care. To have provided you the love & support they did & to instill a confidence & love of learning is not a small thing. It's been a great year, & we wanted to show your teachers how very much we've appreciated all their hard work & that their efforts didn't go unnoticed.
I asked you if you wanted to give them flowers as a gift on your last day. You excitedly agreed, but you told me that you wanted to incorporate your teachers' favorite colors in their gifts. For Miss K, that was orange. For Miss L, that was blue.
We went to Home Depot a month before your last day of school & picked out flower pots, a white one for Miss L & an orange one for Miss K. Over the next week we decorated them. It's so amazing to me how much you've changed since we first started to make this project for your teachers two years ago. This time you picked the colors & the stencils. I just set up all the materials & held the stencils while you painted. You did the rest.
The last thing I asked you to do was to write your name on your painted hand print. Then I painted each letter in pink paint (your favorite). Now your teachers will forever have your sweet four year old handwriting & hand print. You & I both loved the results. There may have been some "Ooooooos" & "Awwwwwws."
We returned to Home Depot to pick out flowers. I had found blue hydrangeas a few days before, & picked them up for Miss L. I love hydrangeas, & they were the perfect color. I let you pick out Miss K's flowers. You walked around the store multiple times before finding the perfect orange flowers.
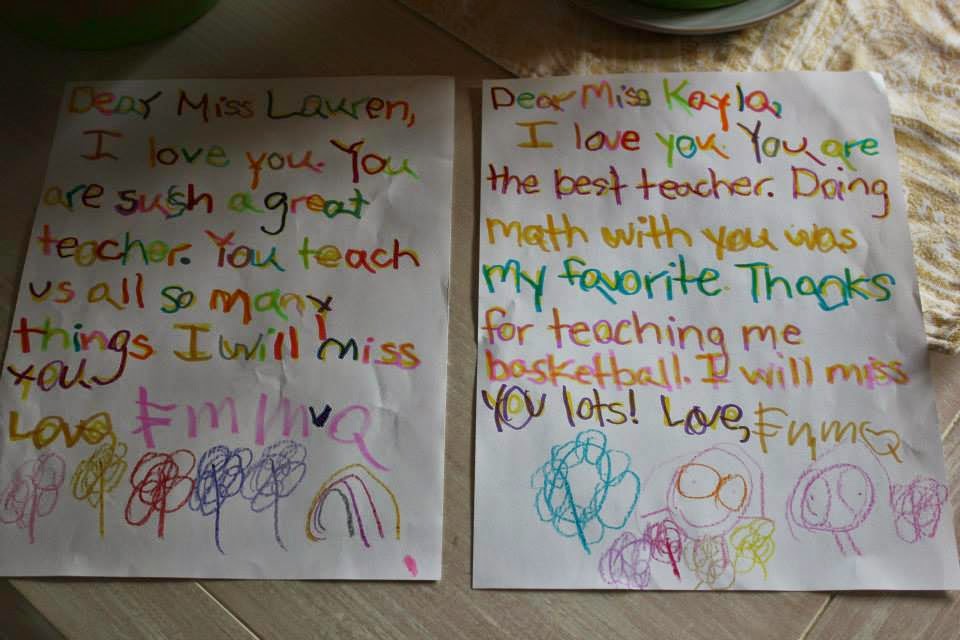
We came home & I planted the flowers in the pots while you wrote letters to your teachers. You told me what you wanted to say, & I wrote it out in yellow marker. Then you traced over the yellow letters in rainbow colors, carefully thinking about what colors your teachers like instead of just including your favorite colors (your very sweet about people's favorite colors). Then you drew pictures & signed your name all by yourself.
I love you so,
Mommy
Subscribe to:
Posts (Atom)