Showing posts with label DIY. Show all posts

Thursday, September 3, 2015

Butterfly Birthday Party: DIY Favor Bags

Dear Em,
I love favor bags that include something that is usable over time. Our favorites are favor bags that include crafts. A few months ago, you went to a birthday party & received a favor bag that included a wooden lizard with paints. You named your lizard Lizzie & loved it. It was a wonderful rainy day activity.

I wanted to do something like that for your Butterfly Birthday Party favor bags. Unfortunately, I couldn't find any wooden butterfly painting activities that weren't crazy expensive (it turns out, I wasn't looking in the right section of the craft store). In fact, even after searching the internet & craft stores, I had a hard time finding anything that wasn't total junk or super expensive. So, I turned to Pinterest.

I made a Butterfly Birthday Board & pinned a bunch of DIYs that looked easy & fun. The first was this Butterfly Sun Catcher Craft I thought the kids would love.I had plans to include all of the paper materials in your favor bags so the kids could make their sun catchers at home. Unfortunately, this was one of those instances where the "easy" Pinterest project ended up being a total pain. Our printer wasn't cooperating, & I couldn't print out the free template from home. I went to Staples to print the butterfly templates, but they wouldn't print them because the image is copyrighted. Whomp Whomp.

That's when Nonnie came & saved the day. She traced & cut out each butterfly template by hand. It was extremely tedious & didn't come out looking exactly the way it did in the website picture. In the end, I think Nonnie was ready to kill me & the butterfly templates. I hope your little friends enjoyed making butterfly suncatchers. We haven't even attempted making ours. I think I'm sick of looking at them, frankly. But I'm still holding out that it will be a fun rainy day activity for you later this year.

Our next craft for the favor bag were these Butterfly Clothespin Magnets. I had plans to make them with you & Nonnie, but Nonnie quickly decided I had too much on my plate. You & Nonnie took over the project, & your butterfly magnets came out super cute.


The last thing to DIY was the favor bags themselves. I had purchased plain, brown bags, & I wanted to glam them up a little bit. We used the same butterfly punch from the craft store that we had decorated the party hats with. Nonnie glued the colorful butterflies onto the bags. It was one of the most simple DIYs we did (& I'm saying this knowing that it was ALL Nonnie).


We cut out circles & glued more punched butterflies to the middle. I wrote "Thank You!," punched a star hole through the circle, & used some pink twine to fasten the circles to each bag (Nonnie actually let me do that part). We filled up the favor bags with the Butterfly sun catchers, a butterfly airplane, a butterfly straw, & butterfly bubbles. Then we clipped the butterfly clothespin magnets to the tops of the bags. Viola, we had favor bags.


Not everything turned out exactly the way I had envisioned, & it al took a lot more time & energy than I would have hoped (so thankful that Nonnie was there to help/take over). Still, I think our favor bags were really stinkin' cute. They were a cute way to send off your little friends & let them know we were glad they were able to come to your party. And hopefully, some of the contents were usable over time (I know we've been using the clothespin butterflies as chip clips).

I love you so,
Mommy

Wednesday, August 12, 2015

Butterfly Birthday Party: DIY Party Hats


Dear Em,
I think we've been pretty successful so far at throwing entertaining birthday parties with fun themes. We go with the theme when picking out the invitations, & we've let you & your little friends dress-up in the themes for most of your birthday parties. That's kind of as far as we've taken your birthday party themes up until this year. I typically get a little lost in the details.

We went to one absolutely stunning birthday party. EVERYTHING went along with the theme, down to the smallest detail. I was absolutely stunned & inspired about how much everything seemed to fit together so beautifully & brilliantly. This year I wanted to focus a little more on the details. I created a Butterfly Birthday Party Pinterest Board. It included DIY pins that looked like they wouldn't drive me crazy with complexity while also being cute.

That's why I decided this year I would make your party hats. I found these on Pinterest. They were adorable, & I knew I could easily create something fun & similar.

Rather than cutting out a ton of butterflies, I bought a butterfly punch from the craft store. While watching TV, I punched out beautiful, little butterflies out of scrap-booking paper. I was so excited that this DIY was really going to be as easy as it looked.

A few days before your party, with six other DIY activities to focus on, Nonnie casually mentioned that it might be easier to purchase purple & green party hats rather than trying to construct them ourselves. She was right, but purchasing party hats wasn't as easy as I thought it would be. It was then that I learned how hard it is to find/buy party hats in one color. I can't even tell you how many stores I scoured, searching for purple & green party hats. Every store had multicolored hats with patterns or hats in rainbow colors. Augh!

I turned to the Internet. With only a couple days before the party, I grabbed the only purple hats I could find that had free 2 day shipping. Green wasn't even an option. Sorry to all the kids who don't like purple.

When the hats came in, Nonnie took this DIY project right out of my hands & made them look beautiful. She used a glue gun to fasten my butterfly cutouts to each of the hats. They looked perfect.


In the end, the hats weren't the complete DIY project I planned, but you loved the butterfly birthday hats...& I think everyone else did too.


Oh, & by "DIY," I mean the only thing I did myself was punch out the butterflies. Ha! Thanks, Nonnie!

I love you so,
Mommy


Tuesday, February 17, 2015

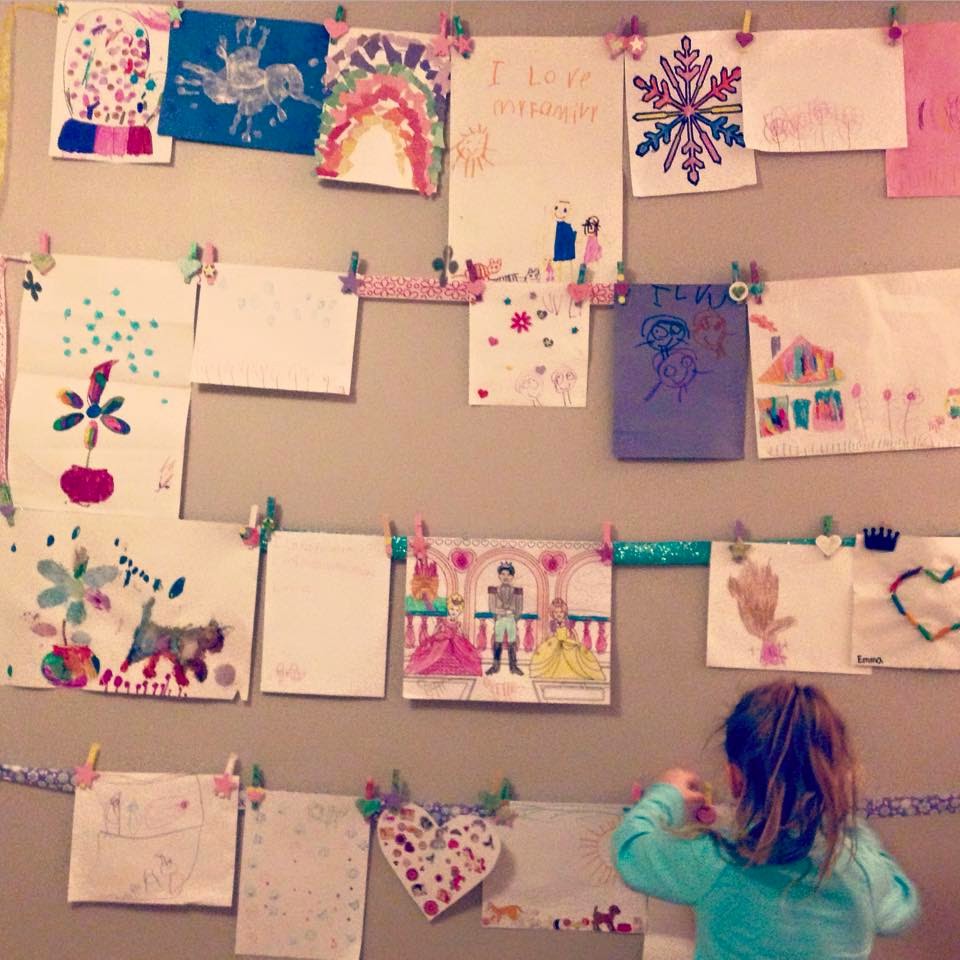
Art Wall Revisited


Dear Em,
Remember how you made yourself a wall to tape up your artwork? Growing up, my mom never even let me tape a poster on my bedroom wall. As a result, I've never been a poster-wall-taping person either. Your taped artwork all over your bedroom wall irked me in a way that only a non-poster-wall-taper would understand (although, we did use painters tape so that the walls wouldn't be damaged). Plus, when we took your artwork down from the walls, it sometimes ripped & got damaged from the tape that had held it on the wall. I was determined to find a better solution to your ever growing artwork display problem.

I was also determined to find a project for us to tackle. There's been so much snow in New England (2 blizzards & multiple other snow days in less than a month), & we've been feeling a little cooped up. Project Make an Art Wall was exactly what you & I needed.

We Used...
- 4 rolls of ribbon
- Wooden clothes pins
- Small flat wooden shapes (hearts, stars, circles)
- a smock & drop cloth (we used a garbage bag)
- assorted paints
- paint brushes
- hot glue gun
- 8 nails
- hammer

We started at the craft store. You & I picked out four different rolls of ribbon in different colors & patterns that would go along with the color scheme of your room. Next we headed to the wooden aisle. We grabbed 40 clothes pins & picked out bags of fun, flat wooden shapes.

Once we got home, I laid a garbage bag across your little white table, put your smock on you, & got out our paints & paint brushes (we keep a box of acrylic paints that we've used for various other projects). You then spent close to two hours happily painting the clothespins & wooden shapes. Daddy & I were pretty excited that your independent painting project gave us over an hour to ourselves. It was parents of a single child paradise to know that you were absolutely content...on your own. That is until we found paint everywhere (it was on chairs, on the wall going up the stairs, on the floor). Oh, well, you win some & you lose some.


I helped you finish up your painting, both because you needed a little help with the number of items that needed painting (I think we painted 40 clothes pins) & someone needed to eliminate some of the excess paint that was oozing off some of the wooden items. You did a really great job, & we set aside all the wooden pieces to dry.

Then we headed upstairs with a hammer & nails. I hammered in one nail on the left side of your wall, a couple inches down from the ceiling. I then measured 17 inches (the height of your tallest pictures) down from the first nail, & hammered in another nail there. I hammered in two more nails, each one directly 17 inches below the one above it. I repeated the same thing on the right side of the wall. I tied the first ribbon tightly (leaving as little slack in the ribbon as possible) to the two top most nails & the next ribbon to the two nails below. I did this until there were four straight lines of ribbon tied to the eight nails.


By then, the wooden clothespins & shapes had dried. I used the glue gun to decorate the clothespins with the shapes you had painted. I let you pick out which shape would go on which clothespin & then glued the shapes to the clothespins. You had a blast decorating your clothespins. I have to say, they looked so much more amazing than the plain wooden pieces we first started working with.


I had piled your artwork on the bed, & the two of us used the clothespins to hang up your many works of art. You can't yet reach the top ribbon, & I hung the artwork up there. You worked on filling up the rest of the ribbon pieces. When we were done, you clipped all your remaining clothes pins to a short amount of ribbon that hangs from the nails.


We spent less than $25, & we were both absolutely thrilled with the result. As we read together in your bed that night, it made my heart so happy to see what was once mostly a blank wall filled with your colorful & unique artwork. Plus, nothing was taped to the walls!!


It's been a little over a week since we created your art wall together, & if you can believe it, it's even more full of art than it was when I took these photos. You've also hung up photographs & some of the Valentines you received. What was once a plain, grey wall has become a wall that you can display things that make you happy, & that makes me wicked happy. I hope as you grow, your wall will continue to be a bright spot in your room. Perhaps you will continue to hang your art work & also pin inspirational quotes & pictures with your gal pals. I'm excited to see what you continue to make of this wall, because if it's anything like you it will be ever growing & changing & nothing less than absolutely amazing.

I love you so,
Mommy

Monday, December 22, 2014

Our DIY Pinecone Christmas Trees


Dear Em,
You did so much crafting this holiday season. We made six shell heart frames & tons of Christmas tree pinecones. You were so excited to craft together in November, but when I told you we were finally finishing our last crafts in mid December, a look of relief spread over your face. You were ready for some Christmas movie down time.

The idea for the Christmas tree pinecones actually came a year ago. We went for a walk in a park in North Carolina & found giant pinecones littered everywhere across the park grounds. I remarked how much they reminded me of pinecones from the Redwood Forest in California & how they would be great to use in making Christmas crafts (which is probably because we had just made these). Your Nonnie agreed, & so the three of us spent the rest of our walk at the park collecting pinecones. We tried to pick large, straight ones. There were so many to choose from, & we ended up returning home with a big bag full.

That bag sat in our basement until a couple months ago. Not knowing exactly what kind of Christmas craft to make, I turned to Pinterest. If you type in "Christmas pinecone crafts," you will find endless ideas. I pinned a few ideas that would work with the giant pinecones we had & then asked you which idea you liked best. You chose to make glittery Christmas trees with a gold star on top.

We used:
- Large Pinecones
- Small Wood Stars
- Gold Paint
- Mod Podge (spray & regular)
- Gold & Silver Glitter
- Paint Brushes
- A piece of cardboard to catch the paint & glitter
- Wire Cutters (if you want to trim the bottoms of the pinecone)

While you painted the stars gold, we enlisted your uncle Jared's help with the pinecones. Some of them were crooked, & he trimmed the bottoms a little so the pinecones would stand a little straighter. Note to self, teenage boys (& maybe most males) do not enjoy making Christmas crafts like you & I do. Jared pretty much hated me 90% of the time I enlisted him to help out with our craft. Sorry, Jared.


While you painted the stars independently, you & I glittered the trees together. Using paint brushes, we generously covered the pinecones in Mod Podge, trying to get every crevice (we probably could have used spray Mod Podge & it would have been easier but then you wouldn't have been able to help as much). Once our pinecone was covered in sticky Mod Podge, we generously sprinkled a mix of gold & silver glitter (creating a champagne glitter look) all over the pinecone.


Later, I sprayed Mod Podge thoroughly all over the pinecones to seal the glitter onto the pinecones. After they all dried, I used a glue gun to fasten the gold stars to to the top of the pinecones. You & I both loved how they turned out. I mean, when you take an adventure at the park & add Mod Podge & glitter (it's still all over the house, poor Daddy), what's not to love?


I think our "trees" are such fun holiday gifts for some of the special people in our lives. I love them so much, we took a bunch for our home (since we made more than twenty, we were able to keep some for ourselves & still gift them to many of our friends & family & your teachers). I love the natural & festive elements they bring to our holiday decor. Looking at them & knowing that my almost five year old & I (& Uncle Jared, sorry Jared) made them together...I think they are going to make me smile for years to come.

I love you so,
Mommy

Wednesday, December 17, 2014

How (not) to make footprints in the sand


Dear Em,
I saw this post a few months back & got so excited. You & I are never happier than when we have sand between our toes. Could we really make your adorable, little footprints in the sand? With you turning five this year, I thought it would be incredibly sweet if we could forever capture your five year old feet & toes.

In order to get as close to five-year-old-ness as possible, I decided to make this around the holidays & include your best friend. I knew her parents would love her footprints in the sand too. I bought enough supplies for two.

We used:
- A sheet (I almost forgot to put one down before we started working & I cringe thinking of the mess that could have been)
- 2 Frames large enough to fit your footprints
- Sand (I bought it from the craft store to eliminate chances of sand fleas/creatures)
- Plaster of Paris (I used a 2kg bag for two frames, but would suggest buying extra if you haven't worked with it before)
- Water for making the plaster
- A piece of cardboard to smooth the sand (we grabbed it from our recycling bin)
- Spray Mod Podge Sealer

The first thing I did was lay down a sheet to catch the sand & plaster mess as we worked. I put our two frames on top of it. Not thinking about how the plaster would need 5 hours to dry, I lay the sheet down in a heavy traffic area of our home. That was my first rookie mistake. Trying to keep little feet & paws from knocking into the frames as they dried would have been almost impossible.

I removed the frames' cardboard backings & glass (the glass isn't needed). Next, I placed the backings on the front of the frames & flipped them over (this video tutorial might better explain). The directions in the original post said this makes a "nice box" to fill the sand into. Except, it is not a nice box. One bump or shift in the frame makes the sand spill out, & you have to fill & smooth the sand all over again. If I were to do it over again, I would have taped the cardboard backings to the front of the frames to create a loose seal.

I filled the frame with sand from the craft store, & used a piece of cardboard to level & smooth the sand (the directions says to fill to where the glass would have been but I missed that part & likely used way too much sand). Next came the hard part, catching your footprints. Your best friend went first. It took her only a couple times to make a nice impression with her feet, re-smoothing the sand each time before we tried a new print. I had to remind her to pick her foot straight up, slowly & gently. Once I was happy with her prints, I began mixing about 1kg of the Plaster of Paris per the instructions on the box.

I tried to pour the mixture gently & slowly (as was instructed in the post), but it's really hard to pour Plaster of Paris gently. It kind of globs down as it goes. I started in one corner & worked my way across the whole frame. Then I used a spoon to softly & gently level the mixture & ensure I had covered the entire frame. At this point I was really afraid I had ruined the whole thing, only I wouldn't know it for five hours, when it dried.

Then it was your turn to come to the next frame to make your footprints. I asked Daddy to begin stirring the Plaster of Paris for your frame as we worked on your prints. The problem is that slow & gentle are just not words that you understand. You stomped into the footprint making experience, making me reset the "nice box" each time time you banged the frame & sent the sand pouring out. After ten tries, your Daddy walked over to see if he could help guide you into more gentle footprint making, leaving the Plaster of Paris he was mixing to set in a bowl on our kitchen counter.

I don't know how many footprint making attempts there were. There were too many to count. During the last one, you somehow toppled over. Your hand landed in the best possible spot...right in the middle of your best friend's frame. Since we were supposed to be careful not to put too much pressure on the plaster, I was pretty sure your firm hand print right in the middle of it was the end of poor S's footprint. 

That was truly the perfect moment for your daddy to chime in. "Julie, something is wrong with this plaster," your Daddy referred to the Plaster of Paris he was supposed to be mixing. "Its not fluffy like the last time. It's really hard. I don't know what is wrong with it." I glared at your poor daddy. Nothing was wrong with it. It was doing what plaster does when someone is not stirring it (like he was supposed to). It hardens.

At this point I may have lost it a little. Plaster & sand covered our house. They were all over the frames, the sheet, the floors, the counters, & you. I may have run outside in the pouring rain & threw the sand & plaster contents of both frames into the woods. I'm pretty sure I returned with crazy eyes. "That's it! We're done! Everyone just go play someplace else!" You all ran away scared. I guess adults can sometimes throw tantrums too.


Except I really wanted your forever footprints in the sand. Sigh.

So, I cleaned up a little. I moved the sheet & the frames into a more secluded part of our house before refilling them with sand. Then I asked you & your best friend to come down one at a time to make your footprints. You did better the second time around (it only took five or six tries). After the footprints were done & you both had gone back upstairs to play, I mixed & poured the plaster one by one. I was still worried I was ruining the footprints as I poured the plaster, but I hoped for the best.


After five hours, I lifted up the frames to see the results. Sand poured out, & I had footprints...but they weren't the lovely & perfect footprints from the post I had originally seen. There were some markings in them & around them. The sand hadn't adhered to prints as evenly or as much as I would have liked (I think I had filled the frames with too much sand?). I sprayed multiple coats of large amounts of Mod Podge sealant, but it's not a sturdy seal. Sand continues to fall off here & there, sometimes in clumps, revealing pieces of the plaster. Instead of footprints in the sand, it looks like footprints in plaster with sand mostly covering them.


Our imperfect footprints hang in the Family Room. There are enough inconsistencies & areas that look a little wonky that it makes me & my type A personality a little crazy every time I look at them. I want to say that if I had to do it all over again, I wouldn't do it at all, but I know that's not true. Even as I write this now, I'm wondering if we tried it again if we would have better results. The possibility of having your little footprints frozen in time is just too much amazingness for me to let go.

I think what I really wish is that I had never seen the Sand Footprint Craft post at all. In this case ignorance would have been bliss for everyone, because I'm already thinking...maybe after the holidays...maybe we could try again.

You & Daddy should run for the hills.

I love you so,
Mommy

Tuesday, November 18, 2014

DIY Fall Wreath

Dear Em,
I love seasonal wreaths. They can bring such warm, natural accents to a home. I've been crushing on a few autumn wreaths recently. The only problem is they're pretty pricey. With the holidays on their way, a super expensive wreath is not in the budget.

So, I decided to get my craft on & make one myself. I headed over to Michaels. Even wreath making can be pricey. Items from the Floral & Decor section of craft stores can quickly add up to lots of money. Luckily, it was after Halloween & all the Christmas decor was already out. Fall decor was 80% off. Pair that with 20% off your total purchase & 40% off one non sale item coupons, & I bought $100 worth of materials for just over $17.

Here's what I used...
- Grapevine Wreath
- 2 different kinds of bunches of autumn colored leaves
- Glue Gun & sticks
- Door hanger


There are many different kinds of wreaths to start with as backings. I went with a grapevine wreath, because it was less expensive than many of the other options. It wasn't as fancy, but it had the natural, rustic look I was going for.

When it comes to wreaths, I like a simple look. Some of the seasonal wreaths I've seen are a little too much for me with glitter & bows & 5,000 different elements. Oh my! I like wreaths that are simple & natural, although not completely natural. I've seen wreaths made with real leaves (& we had beautiful ones in our yard), but I wanted a wreath that we can reuse throughout the years rather than one that would only last us this season. For the sake of simplicity, I only grabbed two different kinds of leaves to work with. I bought 7 or 8 bunches of bright, yellow leaves (I put them on top of the grapevine wreath while in the store to estimate how many I would need to cover the wreath). Then I grabbed a couple bunches of the maple looking leaves that would provide red accents.

I cut the bunches of yellow leaves into smaller segments, leaving just an inch or so of the stem in each small bunch. Then I loosely placed the leaves around the wreath. I wanted to get the spacing just right, before I permanently tacked everything into place. I originally thought I would use the glue gun to glue down each piece, but I soon realized each piece fastened well just by shimmying the stems into the grapevine wreath.


Once I had the yellow leaves spaced out along the wreath just right, I began adding the red leaves here & there. I like how placing the red leaves underneath the yellow leaves provided little pops of red without overpowering the whole wreath. Since I was working with single leaves at this point, I used the glue gun to securely fasten them. Then I gathered the single yellow leaves that I had left over & filled in any empty spots I could see.


In a little less than an hour, I had the rustic, natural look I wanted for a fraction of the cost of seasonal wreaths I had been crushing on.


I love the bright, cheerfulness it brings to our front door. We've already had snow flurries & the majority of the bright leaves in our yard have faded to dull brown colors. Our wreath celebrates our love for New England's autumn colors the whole season long. It's like a coming home to a warm smile, one that we can reuse year after year. Not bad for $17.

I love you so,
Mommy

Tuesday, October 28, 2014

Our Family Tree 2014


Dear Em,
In the midst of this fall's craziness, your teachers handed us the homework bag with a smile. "Oh please no. Is it possible to give us a homework bag another week? We're traveling this week...& things are just crazy." To your disappointment, they were amazing & agreed to give us the homework bag another time (It was quite a wake up call for me that we're going to have to drastically adjust how many things I try to pack in our schedules once you start getting homework on a regular basis).

When your teachers gave us the homework bag again in the middle of yet another crazy, they smiled. "You have to take it now. You are the last one to create a family tree." Whoops. Just like that I became the class slacker.

This is our third time making a family tree. In past years, I may have forgotten that our family tree was your homework. The first year you were 18 months old. I think you sat with me while I made your family tree until I got frustrated that you were touching everything, & I finished the project solo.


The last family tree "we" made also came during a hectic time. "We" may have started working on it after you went to bed (I know, I'm awful). This time, the last time we made a family tree for this school, I wanted it to be a project we worked on together.

Luckily your teachers gave us the weekend to finish your assignment, because I had big ideas for this one. Your teachers may have included a tree that we could use for the project, but, like I said, I had ideas. As you & I went to the store to buy more sturdy poster board, you sighed. "Mom, can't my family tree just be like all my other friends' family trees?" What would be the fun in that?

Here's what we used:
- 1 piece of white posted board
- 4 leaves in different shapes & sizes
- green, red, orange, yellow, & brown acrylic paint
- paint brushes
- two little hands
- scissors
- letters found in magazines
- craft glue
- printed photos
- a computer & printer to make captions

First we made our own tree. We found four differently shaped & sized leaves in our yard. We painted one side of each leaf a different color & used the leaves as stamps. It gave our tree a really textured look, & the colors made perfect fall foliage. You still wished we could use the tree that was provided, but you had a blast helping me stamp our leafy tree.


We waited for the poster board to dry overnight. The next morning I painted your cute little hands brown, & stamped them into the bottom of our painted leaves. They became the branches of our family tree & the starting point of our tree stump. I painted the tree stump the rest of the way down & we waited for it all to dry. Once it dried, I cut out our whole tree.

Not only did I not use the tree that was kindly provided for us, but I also don't follow directions well. We were supposed to make a family tree of family members who live in our home. I couldn't not include your grandparents & aunts & uncles. They may not live with us (although some do during some parts of the year), but they're such a big part of us. We had to include the whole gang (You pointed out that your best friend S is as close to a sister as you're going to get & should be included in the tree. I didn't have any printed pictures on hand, but I promised to add her as soon as I did). We're a small but all inclusive family.

I printed out bunches of family photos & let you pick which ones you like best for your tree. Then while I cut the photos & started to arrange them on the tree, you & your little best friend scoured magazines for the perfect letters to use in our family tree title. I gave you a list of the letters we needed, & you checked them off as we went along.


I arranged the letters into a title & created captions for all the photos. Em, what do you think?! "Well, I still think you should have used the tree they gave us." Sigh. You're probably right. Clearly I could use a lesson or two about following your homework directions, but I love our tree. This tree is a little more than a homework assignment. It's a project we truly worked on together that I hope we can display in our home.


I promise to work on following directions if you promise to keep filling up our tree with love & joy.

I love you so,
Mommy


Related Posts Plugin for WordPress, Blogger...